When I realized I couldn't divide a floor in one of my Butterwick houses to form a dining room and billiard room, I gave up on having a billiard room and thought my nice table would need to go in another project in the future. What I didn't realize, though, is that my coaching arch from Scale Model Buildings had an additional floor above the main floor I thought I was getting.
I kit-bashed it a bit, as it was intended to be a loft accessed by a ladder. One of the things I've had to decide with this project is that it's not always going to be clear how people get up to certain rooms or move from room to room (except for the super-lovely staircase that'll happen on the floor below this one). It's just a sacrifice I think you have to make in this scale sometimes.
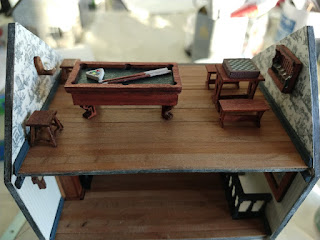
There isn't a lot of room with the roof angled up there, but the billiard table will JUST fit (tall people might need to bend over to play, haha!). The wallpaper is Mini Minutia from Etsy, lovely billiard table as well as the side stools from Petworth Miniatures, the game table is from Templewood Miniatures, the shelf from Mini Etchers, the glasses from Stewart dollhouse, and the bottles either from Stewart dollhouse or Shapeways (I've bought a lot and lost track now). The chess/checkerboard is definitely from Shapeways and printed with the pattern, although I painted around the edges in a color more fitting for the room. I'd intended it for the coffee room but it didn't fit, but this room seemed a nice spot for it.

This means I have the last room semi-finished except some storage spaces and the loft above the carriage house. It's time to move on to some of the exterior work, namely figuring out how to join the two galleries. There is still some make-up work I need to do -- little details that I realized needed to be done and either didn't have the supplies or the patience for. And carpets...I can't say I'm looking forward to sorting carpets as finding the right sizes seems to be very difficult.
I had a moment where completing this room felt like I was getting close to the end, but now I realize there is still so much to do!

Comments
Post a Comment