One of the things I've been doing for all of the buildings in the project is using real stones for flagstone floors, which I think really gives it a more authentic feel. I get them from Stacey's Miniature Masonry, and I thought I'd post a tutorial here on how they're done. The stones and mortar (which Stacey's also sells) come with instructions, but I think it'll be handy to see photos of the process.
I like to lay down a coat of paint before starting, to give the stones something better to stick to, although there won't be any gaps once it's done. Then the first step of laying the floor is to glue all of the stones down with PVA adhesive (tacky glue). The recommended way to do it is to plan them all out in advance, but I don't have patience for that so I usually just wing it! That's probably how they did them back then anyway, right?
At some point you'll probably need to cut a stone or two in half to get ones that fit your last remaining gaps. Stacey's sells a cutter and I've found it pretty handy, but often you can also just snap them in two with your fingers.

In the photo above I intentionally left pretty big gaps between the stones, both because I was running low, and because most of this room is going to be covered with a carpet, so I wanted to test how big the gaps could be. Depending on what sort of look you're going for you can either pack them in or keep them farther apart. I've also used just the flagstones with no grout in the coachway of Traveller's Rest (the smaller stones are Fine Chippings and Extra Fine Chippings from Petite Properties.

Before you grout you need to brush the stones with a mixture of half PVA (tacky glue) and half water. I don't know why, but I've always done it. So factor in that dry time when planning to do the grout.

This process gets messy, so plan on needing to do touch-up painting once you're done. It's almost unavoidable to get a little grit on the walls. For this reason you can see I also do this before the fireplaces are fully installed. I place them while I'm gluing the stones and then remove for the grouting process. Depending on how big the gap is I will go in and touch-up around the "slate" if needed.
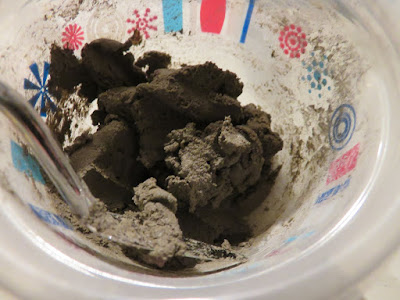
Once all of the stones are down it's time to mix the grout. It's a powder, and you just add drops of water until it resembles a paste.


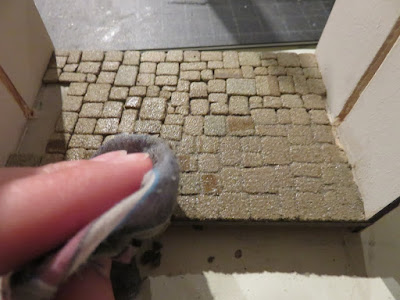
Starting from a corner I spread a little bit at a time (the amount you see me doing is more than the recommended amount but I've found it works just fine. I like to use a palette knife for this scale...as long as you rinse it immediately after you're done it will be reusable.


I personally think these are easier to do than some of the trompe l'oeil methods of doing floors would be, although obviously they're not as fast as printed paper floors. They really add an element of authenticity, though...the waiting room with its wood-panelled walls would not look nearly the same with printed paper on the floor.
I like to lay down a coat of paint before starting, to give the stones something better to stick to, although there won't be any gaps once it's done. Then the first step of laying the floor is to glue all of the stones down with PVA adhesive (tacky glue). The recommended way to do it is to plan them all out in advance, but I don't have patience for that so I usually just wing it! That's probably how they did them back then anyway, right?
At some point you'll probably need to cut a stone or two in half to get ones that fit your last remaining gaps. Stacey's sells a cutter and I've found it pretty handy, but often you can also just snap them in two with your fingers.

In the photo above I intentionally left pretty big gaps between the stones, both because I was running low, and because most of this room is going to be covered with a carpet, so I wanted to test how big the gaps could be. Depending on what sort of look you're going for you can either pack them in or keep them farther apart. I've also used just the flagstones with no grout in the coachway of Traveller's Rest (the smaller stones are Fine Chippings and Extra Fine Chippings from Petite Properties.

Before you grout you need to brush the stones with a mixture of half PVA (tacky glue) and half water. I don't know why, but I've always done it. So factor in that dry time when planning to do the grout.

This process gets messy, so plan on needing to do touch-up painting once you're done. It's almost unavoidable to get a little grit on the walls. For this reason you can see I also do this before the fireplaces are fully installed. I place them while I'm gluing the stones and then remove for the grouting process. Depending on how big the gap is I will go in and touch-up around the "slate" if needed.
Once all of the stones are down it's time to mix the grout. It's a powder, and you just add drops of water until it resembles a paste.


It takes a pretty fair amount of water, and it's pretty tough to overwater if you're using an eyedropper.

You also need to add a few drops of PVA adhesive (tacky glue). I like to do this when it's starting to get closer to a paste but not at the end since I'll keep stirring it up to add the final water.

In the photo above it's in paste form and ready to go. Then it's time to start the actual grouting. BUT hold up because you will need two small wet rags. Be prepared that you will probably have to toss them at the end, and they'll need frequent rinsing so relatively nearby access to a sink is good.

Starting from a corner I spread a little bit at a time (the amount you see me doing is more than the recommended amount but I've found it works just fine. I like to use a palette knife for this scale...as long as you rinse it immediately after you're done it will be reusable.

Once you've got a bit smoothed onto the stones, it's time to take the first of those damp rags and wipe it. This does require a bit of elbow grease but nothing terrible.


The goal is to get ~70% of the grout off the face of the stones at this point with what has become your "dirty rag". As you can see, this results in spreading it further along the floor. And gunking up that rag.

Then it's time to come in with the second rag, the "clean rag," to wipe the remainder off of the stones. You can see they're starting to look good in the photo below.

You can see in the photo below that I've done the whole floor, spreading, wiping with the dirty rag, and then coming in with the clean rag (both rags had to be rinsed multiple times).

The big thing I will say about this is DO NOT STRESS about going quickly. The floor will dry fast once you leave it but you can keep wetting it down with your rags as long as you need to. Once you get the hang of it, I do find it goes pretty fast (I grouted the floors of two Butterwick Houses in like half an hour tonight), but it's totally cool to take your time the first time. And if you find you didn't fill some gaps enough you can totally go back in and touch them up with a bit more (I like to save my grout in a plastic container for this reason...it will keep for a few days, but you can also mix a little on the fly sans PVA for quick touchups).
After the whole thing has been wiped down thoroughly, I like to brush it with a toothbrush to get any last excess off the face of the stones, and particularly to ensure my fireplace gaps are cleared out.


You can see the floor partially dried in the photo below. Some of the bigger gaps may need a second grouting once it's dried, which is NBD.

Ultimately it will end up looking like this! If you look closely, you can see a little gap by the fireplace before I filled it.

And here it is filled. That did prompt a wee bit of touch-up painting on the slate, if I recall.

I personally think these are easier to do than some of the trompe l'oeil methods of doing floors would be, although obviously they're not as fast as printed paper floors. They really add an element of authenticity, though...the waiting room with its wood-panelled walls would not look nearly the same with printed paper on the floor.
The only other thing I'll note is it's best to ensure you've ordered more than enough for your project from the get-go. In my case, because this thing kept expanding beyond my original plans, I ordered in multiple batches and the last batch had much cooler-toned stones than the rest. The good news is the grout has a somewhat normalizing effect on it, and in my case those stones will be used in rooms where they'll mostly be covered anyway.
Comments
Post a Comment